Today as I opened up my new post page my office mate, Bree, asked me what I was going to post about today and I responded with “the door decorating contest” and she squealed with excitement. Quite literally, she squealed. It was adorable, as is our office door!
Apparently in years of Christmas past the office had a yearly door decorating contest. Last year it was voted out and the office was bland and glum through the holiday season. My boss hated it so this year she reinstated the contest. Our department has approximately 15 people in it, Bree and I share an office and the two of us are known as the PC office. It’s related to our job titles… long story. I wont get into it but Bree and I decided that there was to be no half-assed decorations. If we were in it, we were going to be in it to win it. Bree came up with the brilliant idea of creating an advent calendar and it grew from there.

For those of you who don’t know, an advent calendar is basically a calendar that counts down to Christmas and each day you get a chocolate. The idea is that each day someone will rip apart the number sealed envelope and then everyone can dig in. This year December first was a Monday so we decided we had to have this up when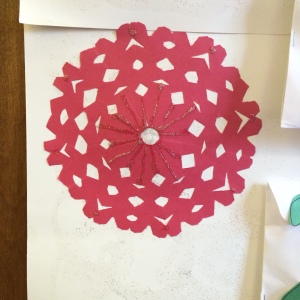 everyone arrived on Monday morning. So we came in on a Sunday, and spent a good 4 hours gluing and cutting and decorating. But this isn’t even the finished product! Each day we are adding decorations to the white background so by Christmas day it will be a master piece!
Want to make your own Office Door Advent Calender? Here is how we did it.
- Supplies: white bristol board, glitter, construction paper, envelopes, glue, scissors, duct tape, chocolate and creativity!
- Step 1: Put glitter all over the white bristol board. Make it sparkle!
- Step 2: Tape your bristol board to your door or window. We made the mistake of using cheap tape and it fell down over night. So the second time around we used good quality duct tape and we taped length wise along the top of each board and then we added tape loops for extra support. This is what is looks like from the back.

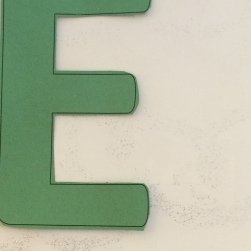
- Step 3: Cut out your letters. We used Microsoft word to create outlines and then we printed those on to the construction paper and then we cut them out. In the picture below you can see the outline from the printer. Then use tape and glue to stick them to your bristol board backdrop.
- Step 4: Fold your envelopes to the desired size, we wanted squares, and fill with candy and chocolate! Tape those to the bristol board backdrop.
- Step 5: Add your extra decorations. We decided to only use green and red decorations on Decemeber 25th. The rest of the decorations are blue. We are making snow flakes, trees, snowmen, Santa hats, gifts, stockings, ect. For step by step instructions on how to make paper snowflakes click here. We have also been using glitter glue to make everything even more sparkly!


So far we are only 5 days into the count down and our office is loving it! People take turns opening each day and everyone is always so excited to see what is in each envelope. The look of joy in everyone’s eyes, that is why I love this. Also it is awesome. I image that this would be successful in classrooms as well as offices. Check back at the end of the month to see the fully decorated finished product!

